Travelers and Bridles. The purpose of a bridle is to provide a place to anchor the lower boom block and allow the boom to be trimmed to a point between the decks. The closer the boom is trimmed to centerline, the closer a boat will sail to weather. The purpose of a traveler is to pull the boom to the centerline allowing the boat to sail closer to the wind.
The distance that the boom can fall off to leeward can be minimized by having a bridle that is close to the boom and attaching the bridle to the hull as far forward as practical and is Class legal. My bridle is at the maximum limit, 24 inches from the aft face of the transom. (Article XI.3.M.X of the By-Laws). Having the bridle at the maximum limit keeps the boom more on centerline without having to use a traveler to pull it to weather. If my bridle were further aft, I would have to use the traveler much more often.
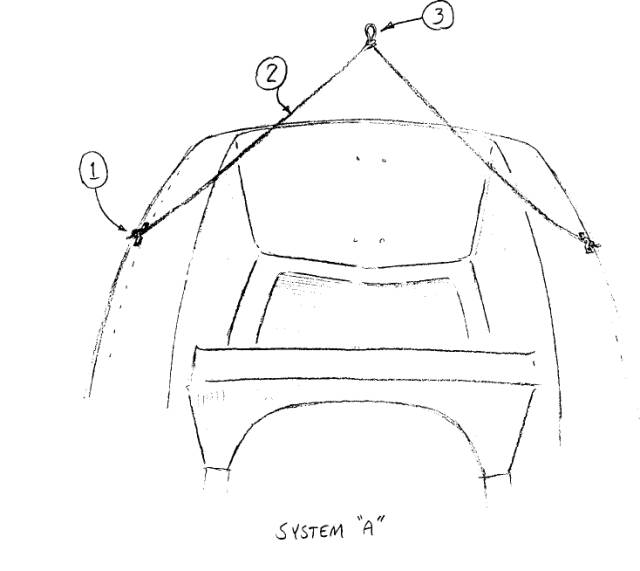
I do not feel that a traveler is a required item. Until you think you are losing races because you do not have one, I suggest you that you save your money. My traveler stays cleated in the centerline position 80% of the time. Instead, just tie the lower boom block to the center of the bridle and forget it. This will be quite satisfactory and is illustrated in the drawing System A.
Traveler adjustment only becomes useful when racing in light or heavy air. In winds of less than 5, I move the traveler to weather to unload leech tension and put more power in the sail. In winds of more than 15, I want to depower the sail, so I let the traveler off and crank down on the mainsheet to increase leech tension.
I am not arguing against the use of a traveler, only pointing out its function. To win races at the top level they are required. There are at least 10 different variations on travelers. Some are illustrated in the drawings included with in this document. They are labeled System B, C, and D. Estimated cost ranges from $100 to $140.
All drawings by John Harris, #5400System A - Fixed Bridle - No Traveler This arrangement is entirely adequate for all applications, except serious racing. It is suggested for anyone that is not exactly sure what arrangement they might ultimately install. If you change to a adjustable traveler system, the only discard will be a short length of line.
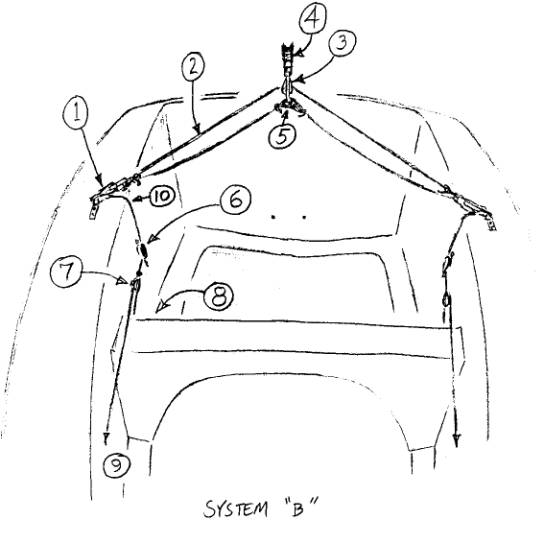
System B - Fixed Bridle - Adjustable traveler
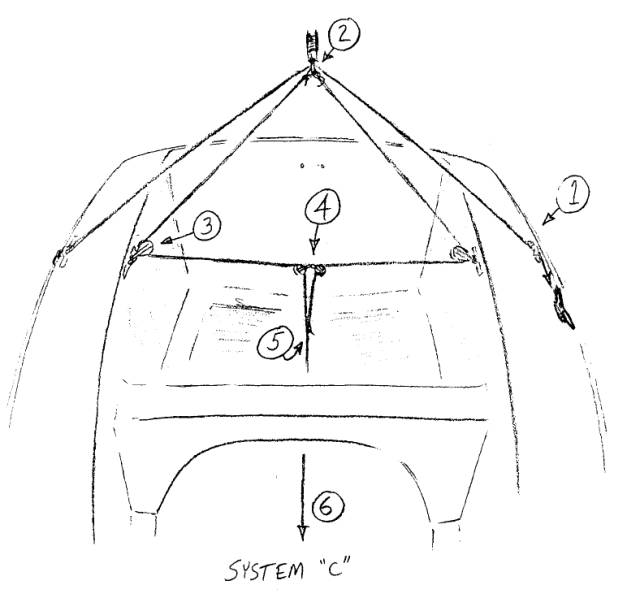
System C - Adjustable Bridle - Adjustable traveler
 This is the High Traveler Rig; a term coined by Craig Tovell, a five time national champion, "Since the function of the traveler is to center the boom when going to weather for better pointing ability, I opted for the high traveler. The bridle is preadjusted depending on the mast rake, so that the traveler block and the boom block are almost block to block when the main is sheeted hard. This ensures that the boom is as close to the centerline as possible, without having to adjust any control lines, as you would if the bridle were low".
"The only disadvantage that I have found is that the height of the bridle must be readjusted when the mast rake is changed - a minor inconvenience. The advantages of the high traveler system include allowing the skipper to center ~e boom and at the same time allow for leech control via the mainsheet for power/depower as needed. Perhaps more importantly, the skipper can concentrate on racing - getting to the weather mark without having to manipulate windward/leeward traveler control lines",
When every thing is tensioned as shown in the diagram the boom can be centered. When line (6) is slacked, block (2) and the boom fall off to leeward, depowering the rig. Bridle height adjustment, jam cleat near (1), is normally made only between races as wind conditions change. The bridle is lowered in heavy air and raised is lighter stuff. Lowering the bridle allows the mainsheet to be used to pull the leech of the sail down, which depowers the sail.
Note that this system does not allow for the boom to be trimmed past the centerline of the boat. A possible disadvantage in light air. But, it never hurt Craig. He did a horizon job in the last race of 1983 Nationals under drifting conditions with this system. 1) Eye straps bolted through the rail outboard of the tanks. The Nico Fico brand eye straps are preferred because the loop of the strap is rounded, which eliminates any binding problems when the block is attached, no matter what the mounting direction of the strap. The Nico Fico 1048 eye strap is a good choice. The bridle is knotted to the eye strap on one side and passes through to a jam cleat on the other side for occasional height adjustment The bridle should be of no stretch 3/16" or 1/4" line; New England Sta-Set X or equivalent. 2) Harken #146 or like is ideal. It has a shackle which allows the bridle to run freely through and to which height adjustment lines are knotted. Friction should not be a problem. 3) Harken #082 bullet blocks, secured to eye straps on the tank sides. 4) Harken #082 bullet blocks secured to an eye strap that backs up lower rudder gudgeon bolts. 5) Height adjustment line. Lines from both sides are spliced into a single line. splicing two 3/16" lines into a single 1/4" line works.
This is the High Traveler Rig; a term coined by Craig Tovell, a five time national champion, "Since the function of the traveler is to center the boom when going to weather for better pointing ability, I opted for the high traveler. The bridle is preadjusted depending on the mast rake, so that the traveler block and the boom block are almost block to block when the main is sheeted hard. This ensures that the boom is as close to the centerline as possible, without having to adjust any control lines, as you would if the bridle were low".
"The only disadvantage that I have found is that the height of the bridle must be readjusted when the mast rake is changed - a minor inconvenience. The advantages of the high traveler system include allowing the skipper to center ~e boom and at the same time allow for leech control via the mainsheet for power/depower as needed. Perhaps more importantly, the skipper can concentrate on racing - getting to the weather mark without having to manipulate windward/leeward traveler control lines",
When every thing is tensioned as shown in the diagram the boom can be centered. When line (6) is slacked, block (2) and the boom fall off to leeward, depowering the rig. Bridle height adjustment, jam cleat near (1), is normally made only between races as wind conditions change. The bridle is lowered in heavy air and raised is lighter stuff. Lowering the bridle allows the mainsheet to be used to pull the leech of the sail down, which depowers the sail.
Note that this system does not allow for the boom to be trimmed past the centerline of the boat. A possible disadvantage in light air. But, it never hurt Craig. He did a horizon job in the last race of 1983 Nationals under drifting conditions with this system. 1) Eye straps bolted through the rail outboard of the tanks. The Nico Fico brand eye straps are preferred because the loop of the strap is rounded, which eliminates any binding problems when the block is attached, no matter what the mounting direction of the strap. The Nico Fico 1048 eye strap is a good choice. The bridle is knotted to the eye strap on one side and passes through to a jam cleat on the other side for occasional height adjustment The bridle should be of no stretch 3/16" or 1/4" line; New England Sta-Set X or equivalent. 2) Harken #146 or like is ideal. It has a shackle which allows the bridle to run freely through and to which height adjustment lines are knotted. Friction should not be a problem. 3) Harken #082 bullet blocks, secured to eye straps on the tank sides. 4) Harken #082 bullet blocks secured to an eye strap that backs up lower rudder gudgeon bolts. 5) Height adjustment line. Lines from both sides are spliced into a single line. splicing two 3/16" lines into a single 1/4" line works.
6) A single line runs to a turning block at the base of' daggerboard trunk and upwards to a swivel cleat that can be adjusted by the crew. Some riggers have terminated the line on a cam cleat mounted on the rear thwart or better to a cam cleat mounted on an SS plate; one end of the plate is bolted to the thwart and the plate extends aft and below the thwart. 

There are all types of bridle and traveler designs. The traveler I use is illustrated as Traveler System D. This traveler is a variation on a design that fell from general favor in the mid-80's. But, I still like it and I have no plans to change to the newer designs. The System D drawing depicts the hardware used and how the lines are lead.
The adjustment line is a continuous loop led to a cleat on both side tanks. The line should be led to a position between the skipper and the crew. This way the skipper can adjust it with his main sheet hand or the crew can play it, depending on who has the upper body strength.
System D - Fixed Length Bridle - Adjustable Traveler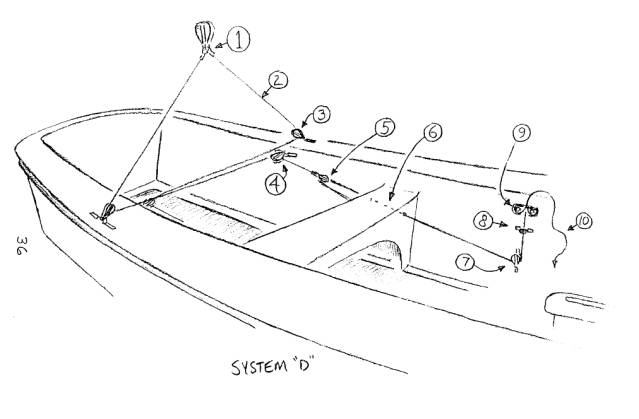
The green line is the traveler. Note that it is continious and
goes under the hiking straps. [The red, white and blue line
happens to be the vang] 
My bridle height is fixed and I never move
the traveler from amidships, except in the really light or heavy
air. And that is what I like about my arrangement, the boom
blocks stay centerline without any adjustment and that means one
less control line to fiddle with.
Getting the correct distance between the
block on the bridle and block on the boom is critical to my style of sailing. I
want the blocks fairly close so that the boom is amidships when I trim the
main, without any adjustment to the traveler. I also want the blocks far enough
apart so that I can over trim and depower the sail when necessary. My bridle is
fairly high and when the main is trimmed for a beat in moderate air, there is
only three inches separating the blocks, however there is almost no load on the
leech. The leech is still open. It is not cupped to weather.