 Building a Composite Wood/Epoxy Windmill SailboatBuilding a Composite Wood/Epoxy Windmill Sailboat
The Windmill, a 15 1/2 foot sloop rigged racing daysailer, was a product of the fertile mind of boatbuilder Clark Mills of Clearwater, Florida. Since there are no hills in that part of Florida on which to run a Soap Box Derby, the local Optimist clubs decided to sponsor a junior sailing program and they asked Mills to design a suitable boat. Clark Mills loved kids so he readily took on the task. His Optimist Pram design has been eagerly accepted by yacht clubs and youth organizations worldwide and more of them have been built than any other boat. Mills donated plan rights to the Optimist Club of Clearwater, then fell to considering a larger craft when the kids he knew so well grew too large to sail the 7' 10" pram.
That the resulting Windmill would become an international one-design class was never dreamed of, and would have been laughed at, had anyone suggested the possibility. All that was wanted in 1953 was a boat 15 year olds could not only sail handily, but could build themselves with a little adult help. That Mills succeeded was obvious as the Windmill spread across the U.S. and most were home built up until the class approved fiberglass construction in 1967.
In the Windmill, as in many other one design classes, the introduction of the fiberglass boat had several consequences which resulted in the rapid demise of the wood boat as an effective force. These were self-rescue capability and a claim of "no maintenance" in a high gloss, high tech package. The lack of self-rescue air tanks at a time when many new classes offered this safety feature created problems with older designs for race committees and prospective buyers. Most builders of wooden boats recognize the glitz of the synthetic product as the greatest hurdle in reaching prospective customers. A few wooden Windmills, like our own DON QUIXOTE, continued to compete but most Windmillers opted for the store bought glass version.
The big reason that the boatbuilding industry jumped into fiberglass production so quickly was not because it was a superior boatbuilding material, but because they could turn out a more glitzy product from predictable sources of supply with far lower skilled workers (read lower wages) at a higher return on the investment dollar. Fiberglass has advantages for the sailor as well. Maintenance can be reduced, although not nearly as much as most people believe. The designer is not limited to shapes realizable from flat pieces of material and also when properly utilized, the synthetics can be very strong. The synthetic molded boat also lends itself to mass production and larger companys with consequent larger promotional and advertising budgets.
For the individual builder, the story is quite different. The necessity to construct a very precise and expensive mold completely eliminates molded fiberglass from serious consideration by one-off builders. The methods used to build large one-off boats in fiberglass are of little interest to lightweight one-design builders.
The reader should not assume from the above that wood becomes the material of choice for the amateur strictly by default as the only material readily available and suitable for his use. On a per-weight basis, wood fiber is both stronger and stiffer than fiberglass. When building boats originally designed for plywood with hard chines and large flat hull panels, fiberglass builders must resort to thin-skinned cored construction to obtain adequate stiffness within the class weight allowances. Another factor is longevity. Each time a fiberglass panel is flexed or highly stressed, it undergoes a small but significant amount of internal micro-cracking. Over time, this repeated stress renders the fiberglass panel soft and weak. Fatigue is not usually an important factor in wood hull design. After all, the tree from which your lumber was sawn has already swayed through millons of cycles before it was harvested. The result is that, in weight conscious classes, wooden hulls usually remain competitive far longer than their glass sisters. There is now renewed interest in wooden boat building, perhaps brought about by epoxy, new construction methods, high cost of the comercial products and maybe exposure to other possibilities through wooden boat festivals and magazines like WOODENBOAT.
Rot and extensive maintenance has always been the bane of wooden boats. Modern epoxies and paint systems have gone a long way toward equalizing this issue. When many people think of wooden boats, they just naturally think of varnished mahogany gleaming in the sun. In low latitudes, brightwork requires considerably more maintenance than painted surfaces - no matter how well it is done. No clear finish can ever provide as much protection from the ultra-violet rays of sunlight as pigmented paint can. The message is clear; to reduce maintenance on a wooden boat, seal the wood with an adequate coat of epoxy, use brightwork sparingly and use the best paint you can buy. If such a boat is kept covered when not in use, it will last for many years with virtually no maintenance. If the inevitable dings and scratches are repaired occasionally and the boat is kept under cover when not in use, it will outlast you and I.
The boatbuilding project which is the subject of this article had its beginning in 1969 when I bought DINGHY BUILDING by Richard Creagh-Osborne which described the many methods by which small boats were being built in Great Britain at that time.
One of these methods was called "composite ply-reinforced plastic hulls" (Fig 1). Although this doesn't sound like a wooden boat, it is really panels of plywood joined along their edges by fiberglass tape and resin. Since epoxy was not available, the earliest boats used polyester resin which all builders know is a poor adhesive and they still held together very well. Creagh-Osborne credits the boatwrights of Norway with first using this technique. The method is especially suitable for hard-chine hulls and those with one or two or more transverse bulkheads at widely spaced intervals. The Windmill, which traces its lineage from the deadrise sharpie, is particularly well suited to this construction. With three transverse bulkheads and full length flotation tanks forming a torsion box down each side, the floppy plywood panels are joined to form a lightweight hull of immense rigidity.
The possibilities of composite construction had a lot of appeal. Using this technique would allow the elimination or simplification of many of the Windmill's structural members like the keel, chine log, stem, transom framing and daggerboard trunk logs. The weight saved in these parts can then be utilized in full length buoyancy tanks, thicker (and therefore stiffer) bottom planking and fabric/epoxy protective covering on the exterior. Eliminating these lumber components not only removes weight but means that nearly all components of the hull have very predictable weight and strength characteristics. This makes it easier for the non expert to turn out a competitive boat on the first go.
Using the standard Windmill construction methods, amateur builders with only sketchy knowledge of wood characteristics often wound up with a heavy, uncompetitive boat. Adding the 16 to 24 pounds needed to install the new buoyancy tanks made it even less likely that the amateur would complete the hull at or near the class minimum of 198 pounds. In a planing boat, excess weight must be avoided if you wish to be competitive. The emphasis on the competiveness of the completed boat is intentional. The Windmill is a performance oriented one-design racer.
Although a look at the gathering at our National Championships each year might look more like a family reunion than a hotbed of fierce combat, the boat consistently holds its own against other classes. When YACHTING magazine conducted their annual one-of-a-kind regattas, the Windmill consistently placed at or very near the top of the rankings each year including a first over-all in the only "heavy weather" version on San Francisco Bay where the races were not counted if the wind dropped below 15 knots.
The early plywood/resin/fiberglass composite boats were usually built in an open framework female type mold. This method gained little acceptance in the United States until the "stitch-and-tape" variation was developed. Many small prams and dinghies, including the Mirror Dinghy, have been wired and glued together since then, although Sam Devlin and a few others have stiched together some impressively large craft. When completed, it is usually not possible to determine whether a composite boat was built in a female mold, on a male mold or was stitched together. However, if the completed craft has to meet strict measurement tolerances in order to race as a one design, the mold-built boat has distinct advantages.
The female mold, like this one
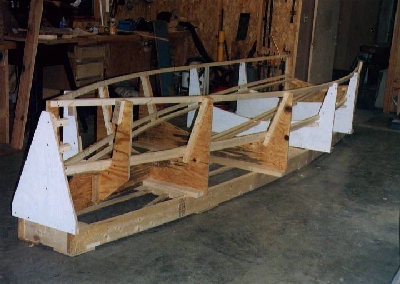
The stitch-and-tape technique is often seen as simpler for the individual one-off builder since no building mold or jig is required. The downside is that, like the shell from the male mold, the shape of the hull must be constantly measured and monitored during the building process to avoid distortions which could easily render the hull into expensive landfill if it doesn't measure in. I find that building an acurate mold is no more trouble than building jigs and fixtures to insure that a stitch-and-tape hull is within tolerance at all measurment stations and stays that way during the building process. In addition, the same mold can then be used to turn out a number of identical hulls. The ability to build in a rigid mold with all parts precut from templates makes this technique attractive to small commercial builders who can turn out hulls with lower skilled labor for most of the work. Perhaps the biggest problem of the permanent mold is what to do with it when it is not being used. I solved this problem for myself by hoisting the mold into the overhead in my shop.
The mold is made from construction grade spruce, selected for straightness and small tight knots, and two sheets of 3/4" exterior sheathing plywood. The mold base is made of two of the straightest 2X6X16' timbers from your stock with the upper edge trued straight and level using a hand plane and a string to check your work. When 2X6 cross pieces are added, these two timbers make an open box with the upper edges forming a level and horizontal surface to which all transverse molds are attached and to which all vertical hull measurements are referenced. The joints of the strongback are reinforced on the bottom edge with plywood gussets and full length diagonal braces are let in to maintain a square and rigid structure. A string is then stretched tightly down the center and set about 1/8" below the upper surface of the strongback to serve as a reference for the whole mold.
This technique allows the transverse molds to be drawn and cut out using the actual class measurement offsets. When boats are built over a male jig, this process is more complicated. First the builder decides on a hull shape within the class tolerances. These offsets must then be translated to a new reference surface to account for the hull being built upside down. Finally, a correction must be made at all points to allow for the thickness and bevel angle of the planking. The Peter Principle has much more fertile ground in which to operate when the boatbuilder lofts for the male jig. I find the female mold easier to build and use although they are apparently rarely if ever used to build wooden boats in the USA. The primary snag in using the female mold is in fitting the plywood panels. If full sized templates are available, this is a non-issue, a cakewalk. If not, the builder must use the cut-and-try method which can sometimes get a bit sticky for the novice. Prospective builders of the Windmill can take advantage of the existing plywood templates which have been duplicated on 10 mil Mylar for ease of shipping.
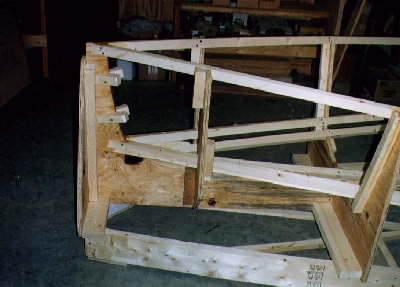
A cross section of the building jig at a typical station mold shows the relationship of the various components.
For the hull bottom and side panels we will need two sheets of 9mm plywood and two sheets 0f 6mm plywood. The two sheets of 9mm can be scarphed by the builder or purchased from the supplier already scarphed. I prefer to join my own panels since I have seen some less than satisfatory scarphs from suppliers. The hull sides of the 15 1/2 foot Windmill require a panel just under 16 feet. Since the scarph takes up 2 inches, two 8 foot plywood panels will be two short after scarphing. Either two scarphs per side must be made or a single butt joint can be used. I made a 6mm X 3 inch wide butt block for the inside of the joint and covered the outside of the joint with glass tape. Some builders have made plywood butt joints without the glass tape on the outside but I consider this very risky. Such joints will fail at very low stress when bent with the butt block on the inside of the arc as they always are in boats. This applys only to plywood and not to solid lumber butt joints, especially when the joint is reinforced with thru fasteners.
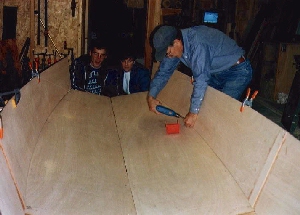
The hull panels are then traced from the templates and cut out. I prefer a jig saw to the circular saw for this job since the new orbital variety became available. The variable speed orbital jig saw and the battery powered drill are the best new tools to come out in a long time. Make the cut so that the pencil line is left on the part. You can always trim to the line but if the line is cut away, you never know where it was. Observe that when cutting diagonally across the grain, one side of the cut is splintered and the other side is relatively smooth. Try to observe the grain pattern and make your cuts in the direction that will put the smooth side on the part to be saved. Starting with the bottom, the hull panels are dropped in and firmly held in place by temporary screws into the stringers.
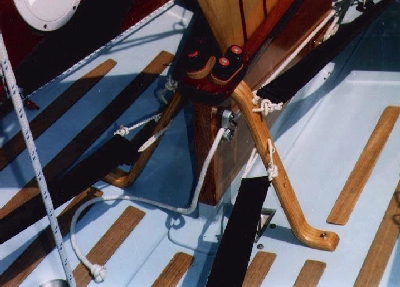
All the hull joints are then fileted with epoxy. Both Gougeon (W.E.S.T.) and System Three provide excellent handbooks for the use of their epoxies so I will not attempt to provide details here. My favorite fileting tool is made from a small piece of 1/16 to 1/8 inch thick plastic shaped as shown. This tool is much more adapable to the various angles and small spaces encountered than tongue depressors or other such tools. One very important point when working with epoxy joinery is to clean up all excess epoxy while it is still soft. While soft epoxy can be whisked away with a squeegee, the hard stuff can be a real pain to sand out. Another critical point is that successive layers of epoxy will only adhere well when the previous layer is either not fully cured or has been well sanded. Some very embarassing joint failures have been observed for failing to abide by these rules. It is for this reason that I do not usually pre-coat plywood sheets with epoxy prior to cutting out the parts, as some recommend. I feel that I get better bonds with less chance of error that way. One exception is to squeegee a thin coat on the side which will be in tension when plywood will be bent near its limits in tortured ply construction or at the forefoot of some hulls. The epoxy bonds the wood fibers and retards the onset of tension caused rupture in these cases. Neither of these apply to the Windmill.
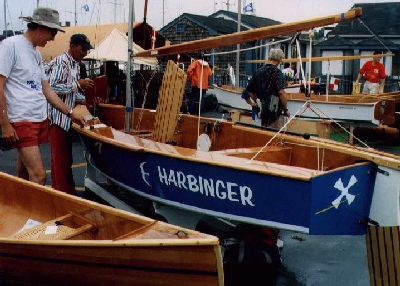
This article is not intended to be a how-to on building a boat. It was written to introduce an alternate and, in many ways, superior method of building small plywood boats. It is especially good for building groups where the bare hulls can be turned out very rapidly and then finish work can proceed on all boats simultaneously. If parts are pre-cut, rough hulls can be completed and removed from the mold much faster, easier and more accurately than with any other building method I am aware of. Building plans are available from the Windmill Class Association and an illustrated handbook for building by the composite method along with full size mylar templates are available from the author. The first Windmill built by this method has proven to be fully competitive with the best commercially built fiberglass Windmills. She was named HARBINGER and placed third in in the 1994 National Championships. With a little improvement in tactics or tiller technique, who knows? At any rate, we hope that she will be the harbinger of many more wooden Windmills to come.
Building a boat is not a trivial pursuit, no matter how
simple the technique is claimed to be. However, woodworking
skill is not the most important attribute that the novice can
bring to the project. The most important ingredients are
motivation, patience and above all, commitment to complete
the job when things don't go just right or your resolve is
being seriously challenged because the task takes more effort
than you thought it would. The ideal project is one that
fits within your individual comfort zone plus a little
stretch to add a measure of satisfaction in accomplishment.
I have built a house, furniture and other wooden bric-a-brac,
tools, musical instruments and sailboats. In the hands of
the sailor, woodworker or musician, a few of these come as
close to having life as objects we are ever likely to
encounter on this planet.